目次
開発環境
- Quest1
- Oculus Link + SteamVR
- Unity 2021.2.0b16.3733
- Unity 2020.3.17f1
- SteamVR Plugin 2.7.3
前提
Playerプレハブを使うので前回の記事で準備ができていること。
実装
- Playerプレハブを使用する
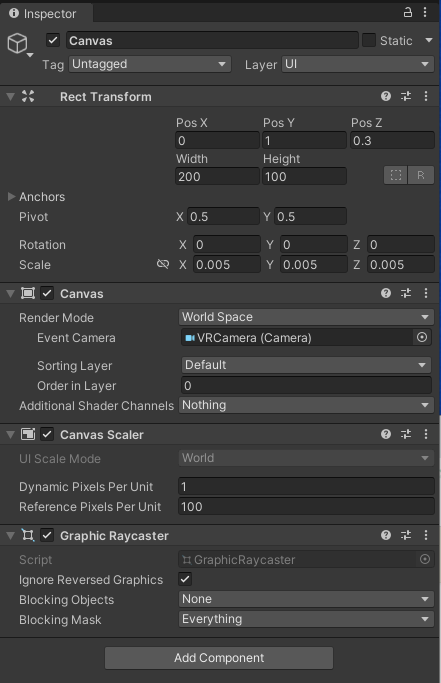
- Canvas追加
- World Spaceに変更して VRCameraを設定
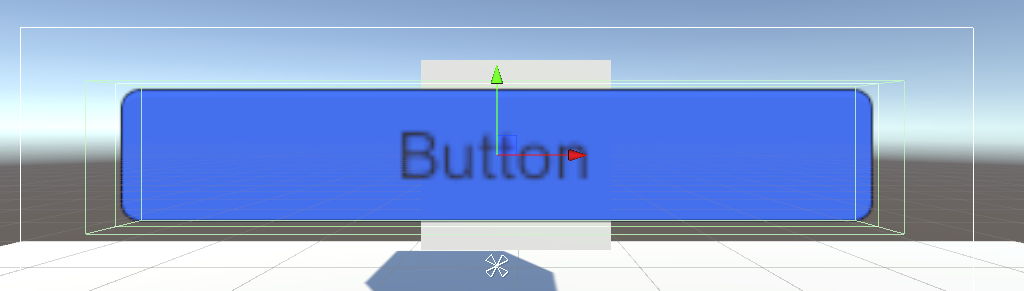
Buttonを追加
- Interactableコンポーネントを追加
- Buttonの中にCubeを追加して、MeshRendererを無効にしてBoxCollider見ながらサイズを調整する
- Rect Transformになってるので一度RemoveするとTransformになる
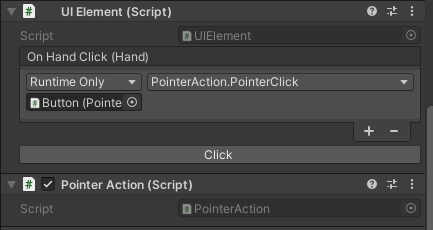
ボタンの動きを実装する
public class PointerAction : MonoBehaviour
{
    private Selectable selectable;

    void Start()
    {
        selectable = GetComponent<Selectable>();
    }

    public void PointerIn()
    {
        selectable.Select();
    }

    public void PointerOut()
    {
        EventSystem.current.SetSelectedGameObject(null);
    }

    public void PointerClick()
    {
        ExecuteEvents.Execute(selectable.gameObject, new BaseEventData(EventSystem.current), ExecuteEvents.submitHandler);
    }

    public void OnClick()
    {
        Debug.Log("Click");
    }
}
ボタンにUI Elementと作成したスクリプトを追加して、UI Elementにクリック時の処理を設定
LeftHandにLineRendererを追加する

- Positionsの1のZを10にする、Widthを0.01にする、Use World Spaceのチェックを外す

- Widthはメモリの部分を直接入力できる

PointerControllerスクリプトを作成する
public class PointerController : MonoBehaviour
{
    PointerAction pointer;
    void Update()
    {
        if (Physics.Raycast(transform.position, transform.forward, out var hit, 10))
        {
            var current = hit.transform.gameObject.GetComponentInParent<PointerAction>();
            if (pointer != null && pointer != current)
            {
                pointer.PointerOut();
            }
            if (current != null && pointer != current)
            {
                current.PointerIn();
            }
            pointer = current;

        }

        if (pointer != null)
        {
            if (SteamVR_Actions.default_GrabPinch.GetStateDown(SteamVR_Input_Sources.LeftHand))
            {
                pointer.PointerClick();
            }
        }
    }
}
- PointerControllerスクリプトをLeftHandに追加する

参考
- スクリプトからボタンクリックをトリガーする方法-UnityAnswers
- 【Unity】コンポーネントを指定しないメソッドの実行方法(SendMessage・MessageSystem) - はなちるのマイノート
備考
もっとちゃんとしたものを作るなら以下の解説が参考になりそう。 CameraRigプレハブと独自実装したInputModuleを使うので、スライダーなども操作可能っぽい。PlayerプレハブにはInputModuleが含まれてるので差し替え可能か要調査。 ただしリポジトリにはライセンスが書かれていないので注意。
- [01][Unity] SteamVR Canvas Pointer - YouTube
- [02][Unity] SteamVR Canvas Pointer - YouTube
- [03][Unity] SteamVR Canvas Pointer - YouTube
- [04][Unity] SteamVR Canvas Pointer (Optional Oculus Conversion) - YouTube
- [05] [Unity] VR Canvas Pointer (Dragging & Project Template) - YouTube
- VR-CanvasPointer/Assets/_Example/Scripts at master · C-Through/VR-CanvasPointer
こちらもInputModuleを実装する例。 - SteamVR でレーザーポインターを実装する - みかづきメモ